

Introduction
Welcome to Askem Classic documentation. Here you'll find:
- How to install Askem Classic on your site
- How to integrate it with your existing web marketing and analytics stack.
Transition to new brand
We are currently transitioning from our old brand React & Share to new Askem brand. During the transition both brands are used in parallel in the materials and domain names of the services. We now call React & Share with a new name Askem Classic.
Install guides
There are three ways to install Askem Classic on any content management system.
Please note that either one installation method is sufficient for your CMS.
Requirements
Whitelist your domain(s) and get your API key
- For Askem Classic to work, you need to whitelist your domain at classic.askem.com.
- Ensure you have whitelisted your production domain correctly to enable data collection.
- You'll find your API Key on the same page. In the case of multiple content sections, you can switch between content sections (and API keys) by using the dropdown menu on the top bar.
Notice: For test purposes you can list your domain as a test domain. In that case the tool gets rendered on your test environment, but no data gets saved.
Allow us to see, where the requests are coming from
We need to know where the requests from your site are coming from. The more detailed the information is, the better we can help you analyze the data. We use the following methods to define the source of the requests:
- A
<link rel="canonical">tag on the page to mark the canonical url of the page. This is required to save the data related to the page and avoid duplicate data. - A
Refererheader matching with whitelisted domain needs to be sent with all requests to Askem. This is usually the default behaviour, but strictReferrer-Policy
Embed code install
Place this snippet exactly where you want the plugin to be shown.
<div class="rns"></div>
<script type="text/javascript">
  (function() {
    window.rnsData = {
      apiKey: 'abcdefgh12345678'
    };
    var s = document.createElement('script');
    s.src = 'https://cdn.reactandshare.com/plugin/rns.js';

    document.body.appendChild(s);
  }());
</script>
Make sure to replace
abcdefgh12345678with your API key.
You can place the embed code to your page templates on any content management system. Here's how it works.
Basic embed code
Plugin settings (window.rnsData)
| Property | Required | Type | Description | Default |
|---|---|---|---|---|
| apiKey | yes | String | API Key that was created upon the registration. | |
| canonicalUrl | no | String | Canonical url of the page or post. | By default the plugin uses the value of <link ref="canonical"> element. The default value can be overdriven by this property. If no link element or property is not provided, the url of the page is used instead. |
To make the analytics dashboard more useful, you can embed more metadata.
Single-page apps
The embed code instantiates the buttons on load automatically. In single page apps, buttons must be updated on page change by calling window.resetRns()
The function does the following:
- Sets the reading time for the previous page
- Sets the referrer of the next page to match the previous page
- Reload the buttons
- Sends a page load event for the next page
Reset the buttons
window.resetRns();
Update manually set metadata and reset the buttons
window.rnsData.categories = ['New category'];
window.resetRns();
If you have manually set any page related metadata in window.rnsData
Google Tag Manager install
Google Tag Manager installation works the same as using the embed code, with one caveat: you'll have to manually specify where the buttons will be shown.
1. Select the element where you want the buttons to be shown
The buttons will be embedded to the bottom of the element you specify. Check the id or the class of the div element and place it inside the querySelector. Type .class if you're using a class, or #id if using an id.
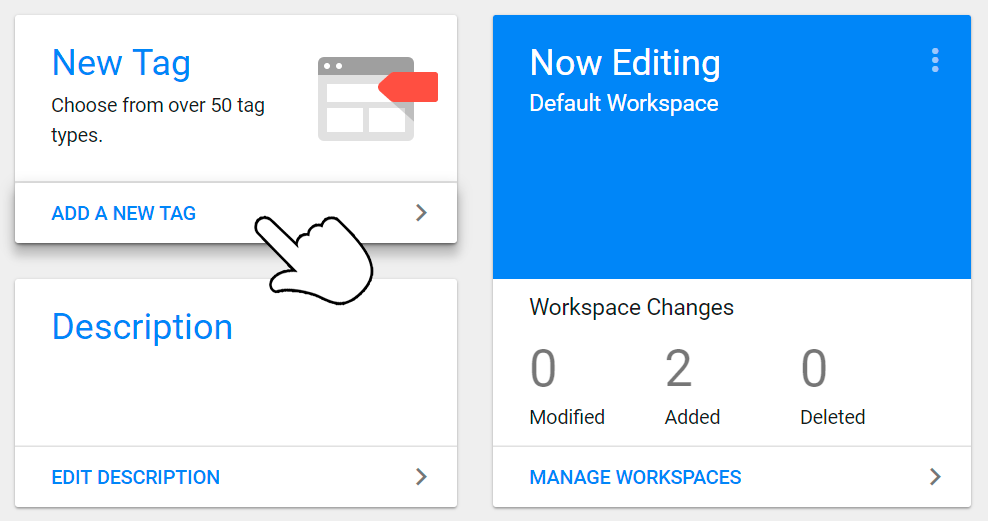
2. Log in to your Google Tag Manager account and click "Add new tag"
3. Click the "Choose a tag type to begin setup..." icon
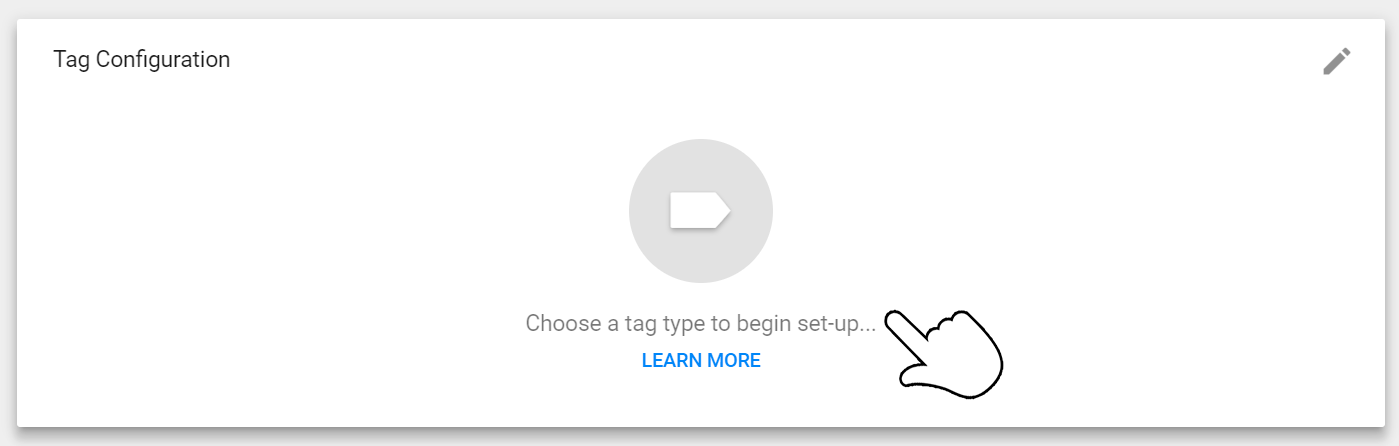
4. From the "Choose tag type" menu, select "Custom HTML"

<script type="text/javascript">
  (function() {
    var rns = document.createElement('div');
    rns.setAttribute('class','rns');
    var container = document.querySelector('id-or-class');
    container.appendChild(rns);

    window.rnsData = {
      apiKey: 'abcdefgh12345678'
    };
    var s = document.createElement('script');
    s.src = 'https://cdn.reactandshare.com/plugin/rns.js';
    document.body.appendChild(s);
  }());
</script>
Make sure to replace
abcdefgh12345678with your API key andid-or-classwith your element selector.
5. In the Tag Configuration HTML field, paste the script on the right
Make sure to replace abcdefgh12345678 with your API key and id-or-class with your element selector.
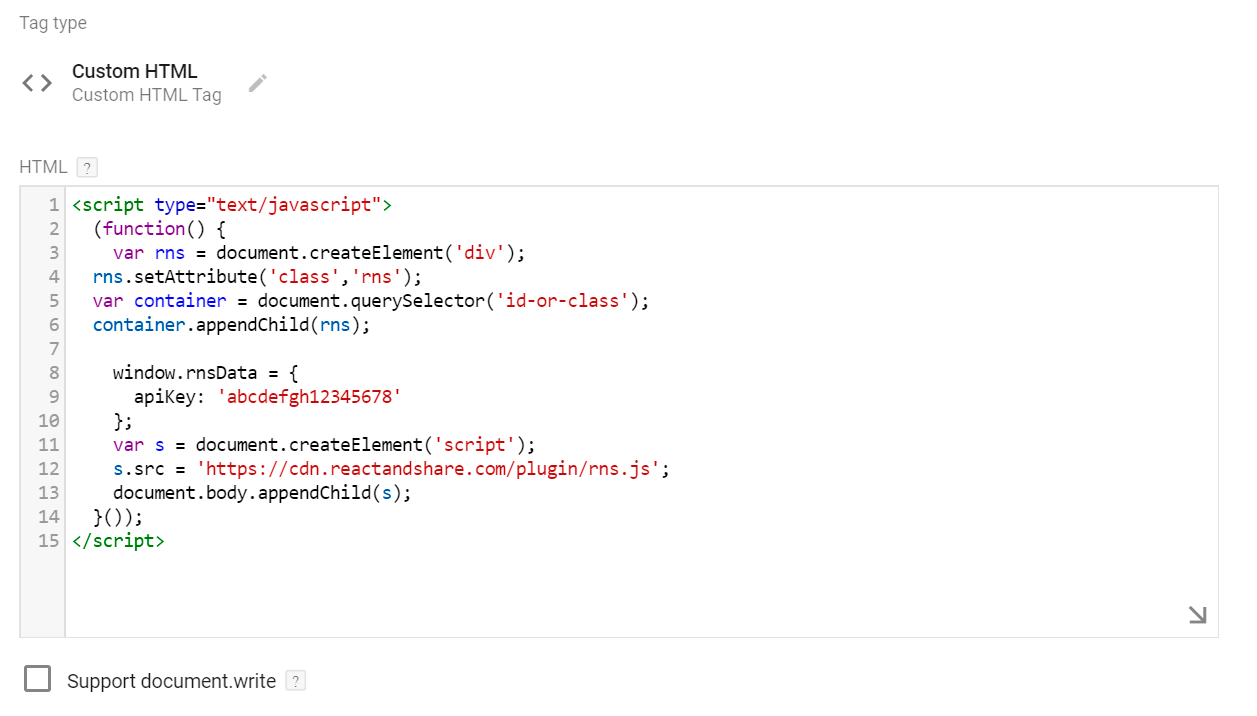
Give the tag a name.
6. Click "Choose a trigger to make this tag fire..." to set your trigger
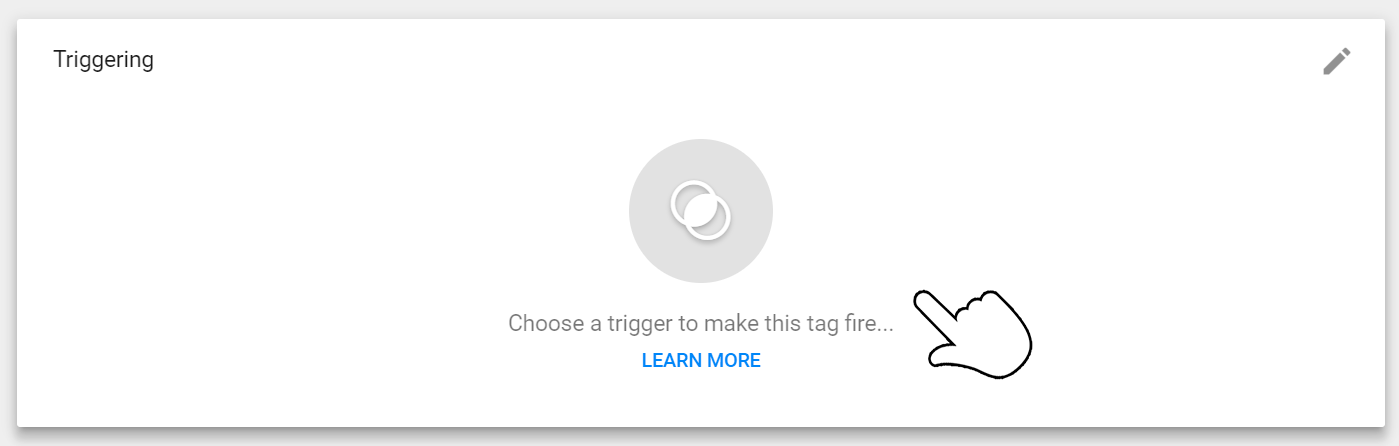
7. Select All Pages
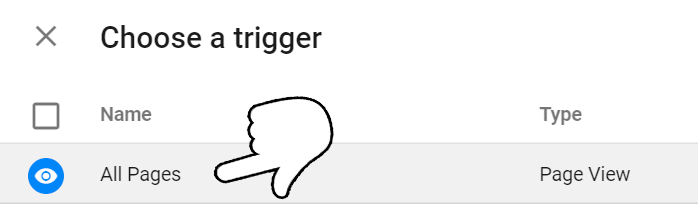
You can also use your own custom triggers. Sometimes it's a good idea to limit the trigger to only some areas of the site. This guide works for most installations, but here's Google's full guide to triggers.
Click Save.
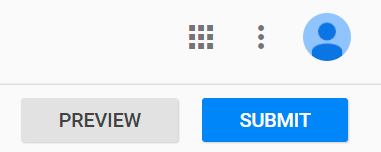
8. Click "Preview" or "Submit"
If you're feeling confident, you can click "Submit" and the reaction buttons should now be visible on your site. You can also click "Preview" and the changes will be visible only to you. Remember to click "Submit" when you want to publish the changes.
And that's it, done!
WordPress install
There are three steps to installing Askem Classic on WordPress. The
- Install the React & Share (still using the old brand name) plugin: Login to your WordPress, click Plugins -> Add new -> search for "React & Share" -> Install & Activate
- Go to the plugin settings page and paste your API key in the field
- Click save - that's it!
You can change the visibility of reaction buttons from the plugin settings and individual content editing pages.
Add metadata
Additional metadata can be embedded in the code as seen below.
<div class="rns"></div>
<script type="text/javascript">
  (function() {
    window.rnsData = {
      apiKey: 'reactandshare123',
      title: 'Testing Askem Classic buttons',
      canonicalUrl: 'https://reactandshare.com/example',
      author: 'Test Author',
      date: '2016-10-28T08:00:34.282Z',
      categories: ['testing', 'categories'],
      commentNumber: 15,
      postId: 'ab1234'
    };

    var s = document.createElement('script');
    s.src = 'https://cdn.reactandshare.com/plugin/rns.js';

    document.body.appendChild(s);
  }());
</script>
Make sure to replace the example values with real values. Values are often easily exported from the CMS or they could be fetch from the page with JavaScript.
Plugin settings
| Property | Required | Type | Description | Default |
|---|---|---|---|---|
| canonicalUrl | no | String | Canonical url of the page or post. | By default the plugin uses the value of <link ref="canonical"> element. The default can be overridden with this property. |
| title | no | String | Title of the page or post. | Defaults to the value of supported metadata, if it exists. If neither metadata or title property exist, the title of the page is used instead. |
| author | no | String | Name of the author of the page or post. | Defaults to supported metadata value. |
| date | no | String or Number | ISO 8601 datetime string or Unix timestamp Type in milliseconds. | Defaults to the value of supported metadata if it exists. |
| categories | no | [String] | Categories of the page or post | Defaults to the value of supported metadata if it exists. |
| commentNumber | no | Number | Number of comments, if there is a possibility to leave comments on the page. | |
| postId | no | String | Custom ID to identify the post/page instead of URL. The use of this is recommended, if the URL is likely to be changed over time. | |
| ctaUrl | no | String | Custom call-to-action URL after a reaction button click. |
Default fonts
Example for disabling the default fonts
<div class="rns"></div>
<script type="text/javascript">
  (function() {
    window.rnsData = {
      apiKey: 'abcdefgh12345678',
      disableFa: true,
      disableFonts: true
    };
    var s = document.createElement('script');
    s.src = 'https://cdn.reactandshare.com/plugin/rns.js';

    document.body.appendChild(s);
  }());
</script>
By default we use third-party Open Sans font and icons from Font Awesome. Open Sans is part of our default look and Font Awesome icons are used for share buttons to show social media icons. They are both licenced with an open source licence and are hosted on our own CDN.
Following settings can be used to disable these fonts to be loaded.
| Property | Required | Type | Description | Default |
|---|---|---|---|---|
| disableFa | no | Boolean | Flag for disabling Font Awesome | false |
| disableFonts | no | Boolean | Flag for disabling Google Fonts | false |
Supported metadata formats
Schema.org (JSON-LD)
<head>
  ...
  <script type="application/ld+json">
    {
      "@context": "http://schema.org",
      "@type": "NewsArticle", // this can vary
      "headline": "The Test Article",
      "articleSection": "Blog",
      "datePublished": "2020-02-14T14:18:17+02:00",
      "image": "https://example.com/thumbnail.png",
      "author": {
        "@type": "Person",
        "name": "Article Author",
      },
    }
  </script>
  ...
</head>
Schema.org and Open Graph are protocols for presenting metadata in machine-readable form. They are used by Facebook, Linkedin and many other social platforms. Metadata is presented with <script> or <meta> tags within the <head> section of an HTML document (see examples to the right).
If present, metadata in these formats will be automatically parsed in the following order (first found is used).
1. Schema.org tags (JSON-LD, Microdata or RDFa format)
Schema.org (Microdata)
<head>
  ...
  <meta itemprop="headline" content="The Test Article" />
  <meta itemprop="articleSection" content="Blog" />
  <meta itemprop="datePublished" content="2020-02-14T14:18:17+02:00" />
  <meta itemprop="image" content="http://localhost/schema-microdata.gif" />
  <meta itemprop="author" content="Article Author" />
  ...
</head>
Schema.org (RDFa)
<head>
  ...
  <meta property="headline" content="The Test Article" />
  <meta property="articleSection" content="Blog" />
  <meta property="datePublished" content="2020-02-14T14:18:17+02:00" />
  <meta property="image" content="http://localhost/schema-microdata.gif" />
  <meta property="author" content="Article Author" />
  ...
</head>
Askem Classic supports the following Schema.org tags:
| Property | Metadata | Type |
|---|---|---|
| author | Author of the page or article | Text or Schema.org author property |
| articleSection | Category of the content | Text |
| datePublished | Publish date and time of a page or article | ISO 8601 datetime string |
| headline | Title of the page or article | Text |
| image | Thumbnail image for the content. This is used in our reports. | Url |
2. Open Graph tags
Open Graph
<head>
  ...
  <meta property="og:title" content="The Test Article" />
  <meta property="og:url" content="https://www.example.com/canonical-url/of-page" />
  <meta property="og:image" content="https://example.com/thumbnail.png" />
  <meta property="article:published_time" content="2019-09-18T13:16:44Z" />
  <meta property="article:section" content="News" />
  <meta property="article:author" content="Article Author" />
  ...
</head>
Make sure to replace the example values with real values. Most Content Management Systems (CMS) also have easy-to-use plugins to automatically add Schema.org/Open Graph tags.
Askem Classic supports the following Open Graph tags:
| Property | Metadata | Type |
|---|---|---|
| article:author | Author of the page or article | Text |
| article:section | Category of the content | Text |
| article:published_time | Publish date and time of a page or article | ISO 8601 datetime string |
| og:title | Title of the page or article | Text |
| og:image | Thumbnail image for the content. This is used in our reports. | Url |
| og:url | Canonical URL of the page or article | Url |
Integrations
Google Analytics
Askem Classic can be set up to send reaction, share and feedback events to Google Analytics or Universal Analytics. If Google Analytics is installed directly in page code, no actions are needed on Google Analytics to enable the feature. If the installation is done with Google Tag Manager, some manual work is required to save the events..
Reaction button click event
Reaction button clicks are sent as a custom event:
Example of a dataLayer object:
  {
    event: 'RNSEvent',
    eventCategory: 'reactandshare',
    eventAction: 'reaction: Like',
    eventLabel: 'Like - https://example.com/post',
    eventValue: undefined
  }
| Property | Description | Value |
|---|---|---|
| event | Name of the custom event | "RNSEvent" |
| eventCategory | Category of the custom event | "reactandshare" |
| eventAction | Whether a reaction is clicked on or off and the given reaction | e.g. "reaction: Like" or "unreaction: Like" |
| eventLabel | Given reaction and the url of the page | e.g. "Like - https://example.com/post" |
| eventValue | Not used | undefined |
Share button click event
Share button clicks are sent as a custom event:
Example of a dataLayer object:
  {
    event: 'RNSEvent',
    eventCategory: 'reactandshare',
    eventAction: 'share: Twitter',
    eventLabel: 'Twitter - https://example.com/post',
    eventValue: undefined
  }
| Property | Description | Value |
|---|---|---|
| event | Name of the custom event | "RNSEvent" |
| eventCategory | Category of the custom event | "reactandshare" |
| eventAction | Share button click on a certain share media | e.g. "share: Twitter" |
| eventLabel | Share media and the url of the page | e.g. "Twitter - https://example.com/post" |
| eventValue | Not used | undefined |
Feedback sent event
When feedback is sent, a following custom event gets sent:
Example of a dataLayer object:
  {
    event: 'RNSEvent',
    eventCategory: 'reactandshare',
    eventAction: 'feedback',
    eventLabel: 'https://example.com/post',
    eventValue: undefined
  }
| Property | Description | Value |
|---|---|---|
| event | Name of the custom event | "RNSEvent" |
| eventCategory | Category of the custom event | "reactandshare" |
| eventAction | Feedback sent | "feedback" |
| eventLabel | Url of the page | e.g. "https://example.com/post" |
| eventValue | Not used | undefined |
Setting up Google Tag Manager
To save the events from Askem Classic, you should have:
- Three custom defined data layer variables for event category, event action and event label.
- A trigger for custom event "RNSEvent"
- A tag for Universal Analytics events
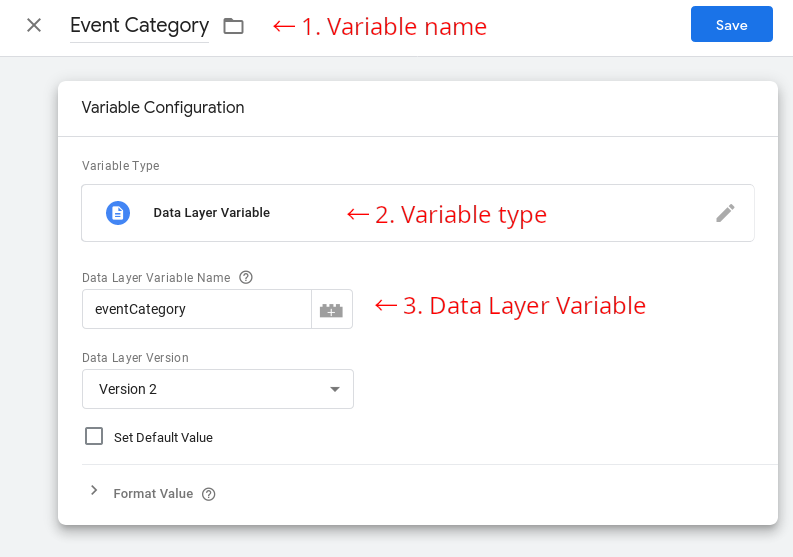
Set up variables
You can create the variables in Variables → Used-defined variables → New
- Give the variable a name, e.g. Event Category, Event Action or Event Label
- Choose variable type Data Layer Variable
- Set the variable name to eventCategory, eventAction or eventLabel
- Save
- Repeat two more times for the other variables
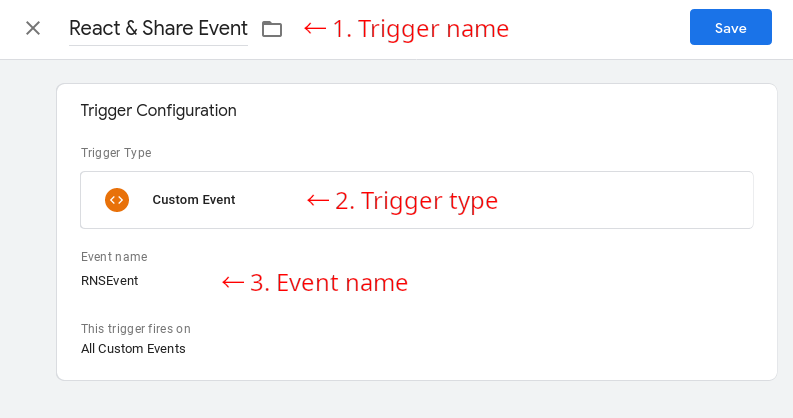
Set up a trigger
You can create a trigger in Triggers → New
- Give the trigger a name, e.g. React & Share Event
- Select trigger type Custom event
- Set event name to RNSEvent
- Save
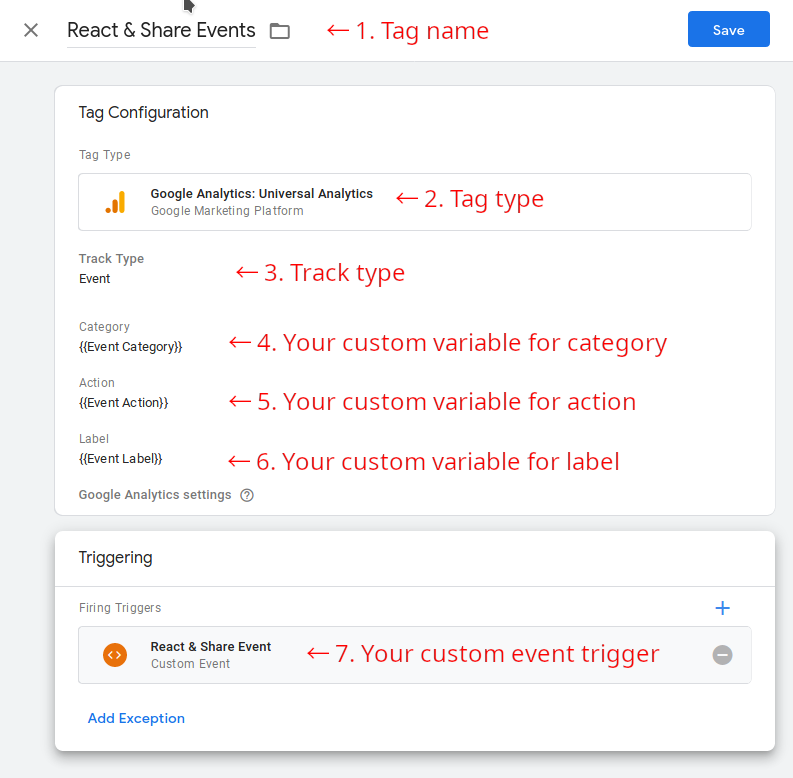
Set up a tag
You can create a tag in Tags → New
- Give the tag a name, e.g. React & Share Events
- Select tag type Google Analytics: Universal Analytics
- Select track type Event
- Select your custom variable for category
- Select your custom variable for action
- Select your custom variable for label
- Select you custom trigger
- Save
After this setup you will find the events in Google Analytics under Reports → Behaviour → Events
Callback functions
Callback functions can be used to call 3rd party services for deeper integration into your marketing and analytics stack.
Callback functions can be embedded to the code as seen below:
<div class="rns"></div>
<script type="text/javascript">
  (function() {
    window.rnsData = {
      apiKey: 'reactandshare123',
      initCallback: function(element, canonicalUrl) {
        // do something with the element
      },
      reactionCallback: function(eventType, reactionLabel, url) {
        // do something with the data
      },
      shareCallback: function(mediaName, url) {
        // do something with the data
      }
    };

    var s = document.createElement('script');
    s.src = 'https://cdn.reactandshare.com/plugin/rns.js';

    document.body.appendChild(s);
  }());
</script>
Make sure to replace the example values with real values. Values are often easily exported from the CMS or they could be fetch from the page with JavaScript.
More detailed instructions on how to use the callback functions can be found here
Plugin settings
| Property | Required | Type | Description | Default |
|---|---|---|---|---|
| initCallback | no | Function | Function to be called after plugin initiation | |
| reactionCallback | no | Function | Function to be called after a reaction button is clicked | |
| shareCallback | no | Function | Function to be called after a share button is clicked |
initCallback
Example
function initCallback(element, url) {

}
This function can be used to access the existing plugin element, e.g. add elements to the plugin.
Function parameters
| Parameter | Type | Description |
|---|---|---|
| element | DOM element | DOM element capsulating the plugin |
| url | String | Canonical url of the parent of the plugin or url of the page. |
reactionCallback
Example
function reactionCallback(eventType, reactionLabel, url) {
  // If someone clicks the reaction "I don't understand" -> open a chat window for quick help
  if ( eventType==="reaction" && reactionLabel === "I don't understand") {
    thirdPartyChat.open()
  }
}
Please notice that
thirdPartyChat.open()is just an example and not a working piece of code.
This function can be used e.g. to trigger 3rd party analytics or marketing automation services.
Function parameters
| Parameter | Type | Description |
|---|---|---|
| eventType | String | reaction or unreaction |
| reactionLabel | String | Label of the reaction button clicked. |
| url | String | Canonical url of the parent of the plugin or url of the page. |
shareCallback
Example
function shareCallback(media, url) {

}
This function can be used e.g. to trigger 3rd party analytics or marketing automation services.
Function parameters
| Parameter | Type | Description |
|---|---|---|
| eventType | String | reaction or unreaction |
| reactionLabel | String | Label of the reaction button clicked. |
| url | String | Canonical url of the parent of the plugin or url of the page. |
Customizations and support
Custom styling
The look of Askem Classic plugin can be customized with CSS similarly as a regular webpage. Use the provided template as a starting point for your customizations. You can add the custom style declarations to your website's style sheets.
The most important selectors are listed here:
/*
  Askem Classic CSS Style Guide
*/
/* General styles */
.rns-plugin {
  /* You can add your general and the Askem Classic wrapper styling here, such as font-family. */
}
.rns-plugin .rns-header {
  /* This affects all headers in the plugin */
}
/* Reactions */
/*
All buttons buttons share the same structure:
  Button
    Label
    Icon
    Count
*/
/* Button */
.rns-plugin .rns-reactions .reactions .rns-reaction .rns-reaction-button {
  /* Add reaction button styles here. */
}
/* Label */
.rns-plugin .rns-reactions .reactions .rns-reaction .rns-reaction-button .rns-label {
  /* Add reaction button label text styles here. */
}
/* Icon */
.rns-plugin .rns-reactions .reactions .rns-reaction .rns-reaction-button .rns-icon {
  /* Add reaction button icon styles here. */
}
/* Reaction Count */
.rns-plugin .rns-reactions .reactions .rns-reaction .rns-reaction-button .rns-reaction-count {
  /* Add reaction button reaction count styles here. */
}
/* For hover/active styles, just add :hover after .rns-reaction-button */
/* For selected button styles, add .selected to rns-reaction (e.g. .rns-plugin .rns-reactions .reactions .rns-reaction.selected .rns-reaction-button) */
/*
All buttons share the same structure:
  Button
    Label
    Icon
    Count
*/
/* Shares */
/* Button */
.rns-plugin .rns-shares .rns-share-button {
  /* Add share button styles here. */
}
/* Label */
.rns-plugin .rns-shares .rns-share-button .rns-label {
  /* Add share icon styles here. */
}
/* Icon */
.rns-plugin .rns-shares .rns-share-button  .rns-icon .fa {
  /* Add share icon styles here. */
}
/* Share count */
.rns-plugin .rns-shares .rns-share-button .rns-share-count {
  /* Add share count styles here. */
}
/* Feedback form */
/* Textarea */
.rns-plugin .rns-inputs .rns-input-field {
  /* Add textarea styles here. */
}
/* Submit button */
.rns-plugin .rns-inputs .rns-form-submit {
  /* Add feedback form submit button styles here. */
}
Tell us your wishes
We are interested to hear your specific needs as our development is driven by them. If you have some specific needs for customization, please don't hesitate to contact us at support@askem.com
Troubleshooting
** The embed code does not work**
Make sure all the requirements ar met. Usually the site domain is not whitelisted properly or Referer header is not sent with requests to our server.
Disclaimer
We do not recommend using Javascript to manually change the behaviour of the plugin. It will most likely cause compatibility issues and can lead to corrupted analytics data. If you are about to change the behaviour, ask us first.